By Ben Nitkin on
Why would anyone make a vacuum out of wood, you ask? I have no idea. But I'm doing it anyway.
Looking around the internet, I saw that Mattathias, of woodgears.ca, had built a dust collector out of wood. It used a Thien baffle for its filtration, and depended only slightly on filters.
Frustrated with the ever-clogging filters of shop vacs, I've wanted to make a cyclonic separator for a while. When I saw his unit - a quiet, standalone separator, I decided to build one.
The unit breaks into two parts: a cyclonic separator and a centrifugal fan.
The cyclonic separator (Thien-type) is a cylindrical unit that produces hurricane-style winds. Dust-laden air is injected at the rim of the cylinder, and whips around in circles. The heavy dust is thrown to the outside of the cylinder, and falls down to the base of the cylinder. A slot cut into the bottom of the cylinder admits dust while blocking the cyclonic wind, and the dust falls into a bucket below. The lighter air is sucked out of a port in the center of the cylinder.
I started designing the cyclone with the bucket. A 10-gallon bucket (you know, the type that paint, plaster, and tar come in), has a 12" radius, so that became the inside diameter of the cyclone. I wanted the whole unit to stack nicely.
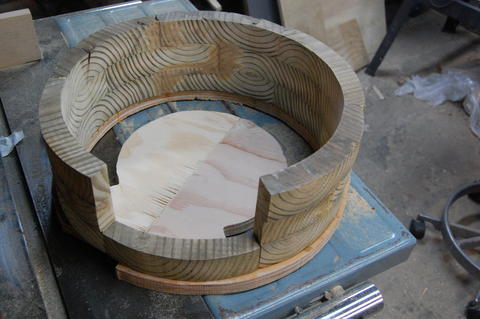
I built the cylinder in segments of 2x8 wood. Using a rope, I scribed arcs onto the board, with a radius of 12" and spaced an inch apart. A little bandsaw work later, I had a pile of arcs. I staggered three tiers of the arcs, paying attention to internal smoothness, then glued the parts into two semicircles. After the glue set, I added wood filler (a mix of fine sawdust and glue) in all of the cracks. The cylinder, after all, has to be airtight.
After each side dried, I sanded the insides on the edge of the belt sander to be nice and smooth, then glued the two halves together. That gave me most of a cylinder (image 1); I'd intentionally left a gap for the air inlet.
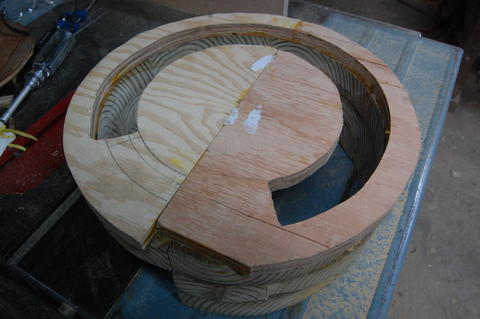
Next, I built the baffle (image 2). The internal diameter of the cylinder was 12", so the plywood circle needed to be 14" across. I cut two semicircles out of some plywood scrap, then cut the arcs and glued them together. That gap provides space for dust to fall into a bucket below while blocking airflow from disturbing the collected sawdust.
That's where the baffle stands now. I still need to give it a lid and an inlet chute to guide the air into its cyclonic motion.
The impeller was more difficult. The impeller is a rotary fan that draws air in centrally, and drives it out at the edges. It'll attach to the Thien separator to provide vacuum.
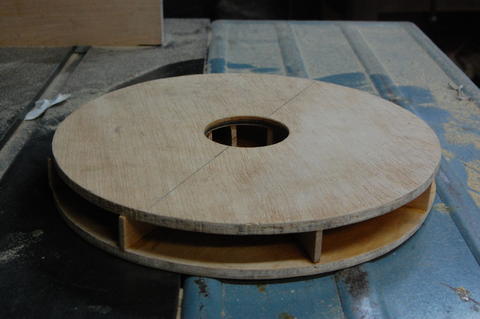
I began by cutting two 10" plywood circles for the impeller housing, and eight small blades. One of the impeller faces has a 2½" hole on center, for intake. The other has a ½" centered hole to mate with the motor. The fins span 4", from the edge of the hole to the outer rim, and are about 1/8" wide. I divided the lower disk of the impeller into eights, marked it with pencil, and glued the impeller fins down. Then I applied glue to the top of the fins and attached the second disk, paying attention to the centering (image 3).
After the glue dried, I suspended the impeller on a large marble, and balanced it by sanding away at the heavier side.
With the impeller drying, I made its housing. Without a cage, the impeller will blow air every which way; with it, the output is directed and can be captured. (Also, if the impeller blows up, it'll be contained and not take someone's eye out.) I'm building the blower as a physically distinct unit from the separator. That way, the blower can be used as a blower for other purposes - say, a fume hood, or a really strange hair dryer. And the separator can be hooked up to a conventional shop vac, should that be useful. Another benefit of keeping the parts modular is modification: I don't have a filter right now, but I can add a filter in between the separator and the blower, should it prove necessary.
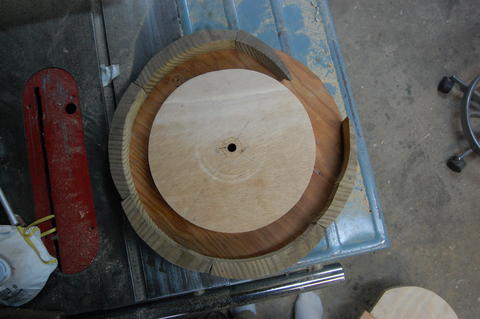
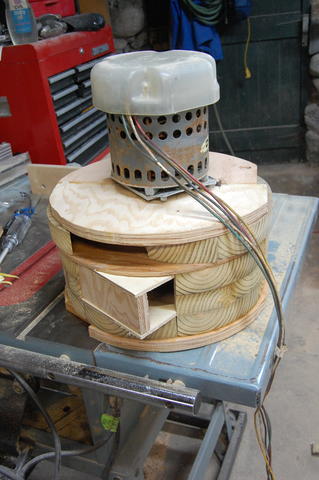
The cage helps guide the air; it's made of the same segments as the separator. I made another 14" round out of ¼" plywood, and nailed the airguides down (image 4). I want to be able to move them, should the current pattern work poorly.
I need to attach the motor to the impeller, finish the impeller cage, line the airguides with sheeting, and add some ports for vacuum hoses.
Then I need to paint the thing. Preferably absurdly.
But, for now, I have a stack of cylinders, and they're coming along! VACUUMS! (image 5)
